Demystifying Hyper-V Snapshots

Snapshots must be one of the nicest features in Hyper-V. Unfortunately, too many people are confused, justifiably in my opinion, about how exactly the snapshots work in Hyper-V. I am not talking about taking snapshots and restoring to a previous snapshot. That’s simple enough even for a ten-year-old kid. I am talking about how differencing disks work, why sometimes when you delete snapshots the disk is merged while other times it is not, what exactly is saved in a snapshot folder, how to save an image so it consists of only one portable VHD file, what should you do if you want to save an image and load it on another computer but the image has one or more snapshots, what happens to the virtual machine’s settings and how can you back them up…….and a gazillion other similar questions that come to mind when working with Hyper-V virtual machines.
Well, I can’t cover all the possible scenarios in this article so I will discuss some fundamental concepts and explain how snapshots work behind the scenes and how you can deal with an image that have snapshots attached to them, especially if you intend to backup and load that image to another computer.
Under the Covers
Microsoft Virtualization Program Manager Ben Armstrong has documented how snapshots work “under the covers.” I have the pleasure of having Ben speak at my User Group in Seattle. Known in the industry as the Virtual PC guy, he is a recognized authority on virtualization. Here’s is what he has documented in his blog.
When you take a snapshot of a running virtual machine:
- We pause the virtual machine.
- We create a new differencing disk for each virtual hard disk and hook it up to the virtual machine.
- We make a copy of the virtual machine’s configuration file.
- We resume the virtual machine (note that this happens so quickly that you do not know that the virtual machine was paused at all.
- Once the virtual machine is running again we start saving the contents of the virtual machine’s memory to disk.
- While this is happening we monitor memory activity inside the virtual machine and if the the guest operating system attempts to modify memory that we have not copied, we intercept the write attempt and copy the original memory contents then allow the write to go through.
Once the snapshot is completed we have a set of the virtual machine configuration file, the virtual machine saved state files and the snapshot differencing disks (.AVHDs) stored in a folder under the virtual machine’s snapshot directory.
This is now treated as a read-only “point in time” image of a virtual machine. You can apply a virtual machine, in which case we set the virtual machine to start from a copy of the snapshot. You can change the virtual machine settings after applying a snapshot – but you cannot change the snapshot settings themselves.
You can also delete a snapshot. If you delete a snapshot that has no descendants (snapshot with differencing disks that reference the snapshot being deleted) then the files associated with the snapshot will just be deleted. If you delete a snapshot with only one descendant the configuration and saved state files for the snapshot will be deleted and the snapshot differencing disks will be merged with those of it’s descendant. If you delete a snapshot with more than one descendant the snapshot configuration and saved state files will be deleted – but the differencing disks will not be merged until the number of descendant snapshots is reduced to one.
A Closer Look at the Snapshots
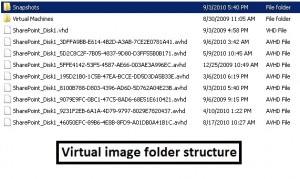
To elaborate on what Ben has documented, let’s look at an example. Let’s say you have a virtual machine with several snapshots. You would like to make a backup of this virtual machine and load it on another computer. The folder structure of the virtual image looks like this.
Notice there is a Snapshots folder and a Virtual Machines folder. There is one .VHD file that has a date of 9/3/2009 (more than a year old). There are seven .AVHD (snapshot differencing disks) files, each with a date that corresponds to the time when the snapshot was taken. The Snapshots folder looks like this.
This structure contains a bunch of XML files and additional folders labeled with GUID numbers. If you look inside the folders they contain .BIN and .VSV files.
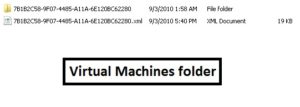
Finally, the Virtual Machines folder looks like this.
This folder structure looks very similar to the Snapshots folder except that it only has one XML file and one GUID folder that contains a single .BIN and .VSV file.
At this point if you were to delete the oldest snapshot and then turn off the virtual machine, you will notice that the size and the date of the .VHD file that you need to export to another machine will still have the old date. The reason being you deleted a snapshot that has more than one descendant. Although the snapshot that you deleted will have its configuration and saved state files deleted but the differencing disk is not going to be merged with the .VHD file until you are left with only one snapshot. Even if you delete the second, third, fourth, fifth and sixth snapshot, the differencing disks (.AVHD files) will still be there until the merge takes place. Therefore, if you want to get rid of all the snapshots (.AVHD files) and be left with only one .VHD file, you will have to delete all the snapshots and then turn the virtual machine off.
NOTE: Even if you delete all the snapshots and then shut down the virtual machine, your differencing disks (.AVHD files) will not be merged. You must TURN OFF the virtual machine, not shut it down.
Once you have deleted all the snapshots and then turn off the virtual machine, the differencing disks will be merged at that time. Depending on the size of the differencing disks this may take several hours. The status in the Hyper-V console will display the percentage of completion.
Exporting the Image
To make a copy of the virtual machine so you can load it on another computer, you can export the virtual machine. The virtual machine must be turned off before you can export the image. Even if you have a bunch of snapshots, you can still turn the computer off and export it. The entire file structure, including the snapshots, will be backed up in the exported folder. For example, create a folder called Exported Hyper-V Images. Do not create sub-folders in this folder because when you export an image it automatically creates a folder for the image with its name. You will an XML file in the root of the folder structure plus three other folders.
- Snapshots (contains snapshots, unless you don’t have any, in which case this folder will be empty)
- Virtual Hard Disks (contains a .VHD file)
- Virtual Machines (contains a .EXP file)
You can simply copy this entire folder structure to another computer and load the image. All your snapshots will be intact, along with the virtual machine settings.
#CLUSTER-INVARIANT#:{GUID}
On a side note, you may have noticed a strange entry in the notes in the Name section of your Hyper-V settings. It’s not something that you added. The entry adds the #CLUSTER-INVARIANT# after the notes so it looks something like this:
Corporate Server image used for training and testing.#CLUSTER-INVARIANT#:{abba09d4a-e956-4367-8357-f46bd7ea6d4}
DO NOT delete or edit this entry after the notes. The Virtual Machine Manager (VMM) adds these values to the notes field so that the system can associate a specific virtual machine with VMM. If you move a VMM from one host to another without VMM having any knowledge of the move, these fields are used to reassociate the VM.
Hopefully, you have a better understanding of how snapshots work behind the scenes and how to better manage them. There’s much more to managing Hyper-V images. I plan to address other issues at a later time, such as how to manage the networking aspects of Hyper-V.
Copyright ©2010 Zubair Alexander. All rights reserved.


hi,
do you know if I can add some custom text after this, let’s say next line? or the notes is blocked??
As I mentioned in my article “DO NOT delete or edit this entry after the notes.”