Managing Office Document Cache in the Upload Center

There are lots of services and tasks running on a Windows operating system. While most of them are necessary for the operating system to function, there are several that can be disabled safely without impacting the operating system. In October 2007 I wrote an article called Tweaking Windows XP Services. In that article I mentioned that there are almost 80 services that are running on an average Windows XP computer but in some cases there are only about 20 services that are necessary. I went on to describe all the services that are necessary in detail.
The newer versions of Microsoft Office include an Upload Center which allows you to see the state of the files that you are uploading to a server. The Upload Center uses Office Document Cache. This feature can be useful if you are using Microsoft’s OneDrive or SharePoint server because if you lose the connection to your server, Office will cache your files locally and when the connection is restored your files will be automatically uploaded to the server. If you don’t have a need for the Office Document Cache and the Upload Center it is yet another service running to consume your computer resources and you may want to disable it. For example, if you don’t use a Web server, such as SharePoint server, that allows you to manage your documents or if you are not using Microsoft’s cloud-based storage called OneDrive then you may want to disable Office Document Cache. Later in this article I will show you how to hide or disable this feature but let’s first take a look at how you can manage the Office Document Cache.
Configuring Upload Center Settings
To start the Upload Center you can click the orange up-arrow in the taskbar if the Upload Center is already running. If it is not running then in Windows 8/8.1 you can go to Search and type Upload Center to locate it. You can open Microsoft Upload Center and manage the settings. The Settings option allows you to configure several Display options and manage the Cache Settings.
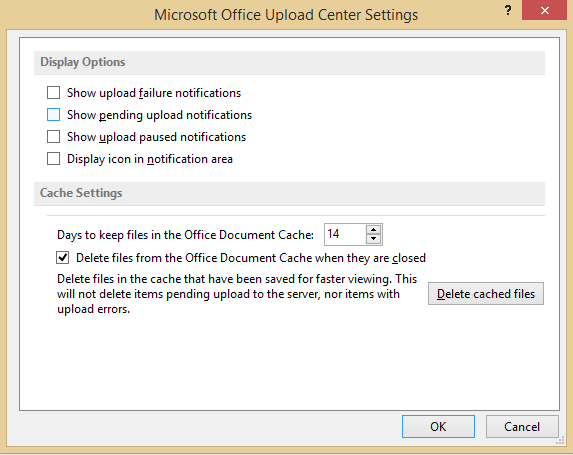
In addition, you can pause the uploads and you can upload all the files in the Office Document Cache to the server. You can also select which files to view in the Upload Center. For example, you can view only the pending uploads, recently uploaded files or all cached files. You can change your view of the files in the Upload Center to either Tiles or Details. In the Details view you don’t see the Resolve button but you can use the Actions item on the menu to resolve the issue. There’s more information on resolving issues in the next section.
Resolving Issues
If a document is stuck in the Upload Center it could be due to loss of connectivity to the Web server, or because the upload process was interrupted for some reason. This will require you to take an action. For example, if you were uploading your files to a server, such as OneDrive or a SharePoint server, and you lost the connection to the server, the file may be available in the Office Document Cache and the status column will show you what the problem might be. Based on the status of the file you can take an appropriate option from the list of options shown in the screenshot below.
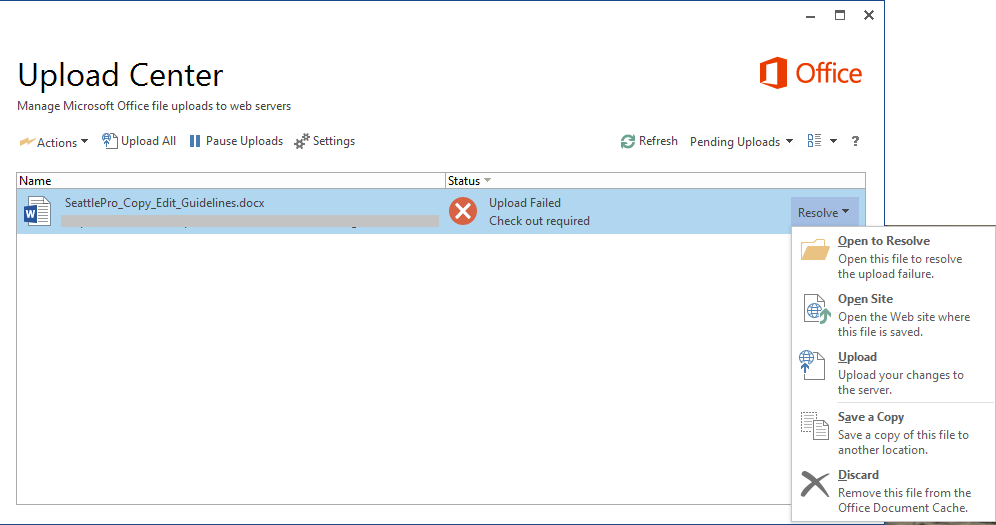
To resolve the issue with files in the Office Document Cache, click on the Resolve drop-down button on the right-hand side of the document. You will see several options listed in the drop-down box.
- Open to Resolve: Open this file to resolve the upload failure.
- Open Site: Open the Web site where the file is saved.
- Upload: Upload your changes to the server.
- Save a Copy: Save a copy of this file to another location.
- Discard: Remove this file from the Office Document Cache.
I should point out that the Actions menu item in the Upload Center offers you the same 5 options that are available under the Resolve drop-down. Because in the Details view you don’t see the Resolve button, you can use the options under the Actions instead. Keep in mind that when you discard a file you remove it from the Office Document Cache, therefore you will be prompted to confirm your action. Normally you can discard a file if it has already been saved to the server and you don’t need to save the local copy.
Hiding the Upload Center Icon
Some people prefer not to see the Upload Center icon in their taskbar. You can either hide the Upload Center icon if you don’t want to see it or you can disable it. Here are the steps to hide the icon.
- To hide the icon click on the up-arrow on the taskbar.
- Click the Customize link to open the Notification Area window.
- Select Microsoft Office Document Cache and in the drop-down box select Hide icon and notifications.
- Click OK.
Disabling the Microsoft Upload Center
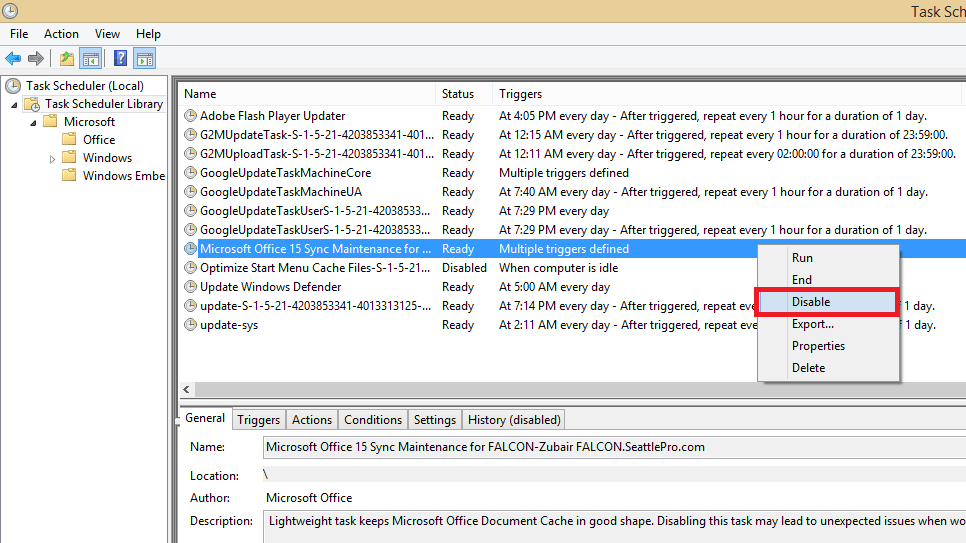
To disable the Upload Center, which will also disable the Microsoft Office Document Cache, you need to go to the Task Scheduler.
- In Windows 8/8.1 go to Search and type Task Scheduler.
- In the Task Scheduler, select Task Scheduler Library.
- In the right-hand pane click Microsoft Office 15 Sync Maintenance. Office 15 refers to Microsoft Office 2013.
- Right-click the task and select Disable.
- Close the Task Scheduler.
- Your Upload Center is now disabled.
Copyright © 2015 SeattlePro Enterprises, LLC. All rights reserved.

