Add Color to Spruce Up Your SharePoint 2007/2010 Content

Is your SharePoint content too boring? Wanna add some color to make it more fun? Well, here's one method you can use to make your SharePoint content a little more lively by applying some color coding. I got this idea (and the script) from Christophe about using HTML code in calculated columns. So here it goes. 
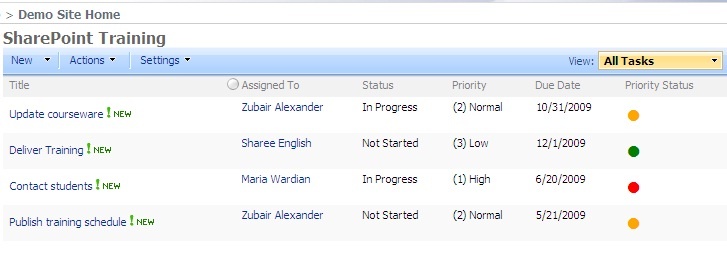
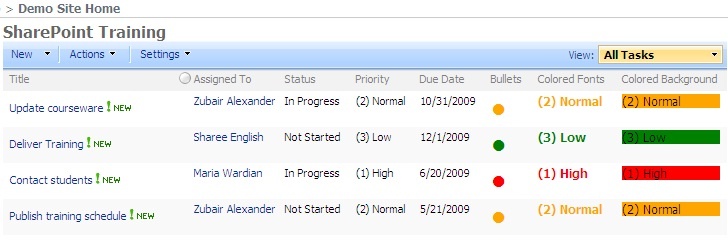
In this article, I will use a SharePoint List and add color coded bullets to distinguish various priorities (low, medium, high) as green, orange, or red. If you make the size of the bullets big enough they look more like a traffic light. This helps you quickly identify the items that have been assigned a certain priority. For example, all the high priority items will be displayed in red. Here's what the end result would look like. The end result is achieved by utilizing a calculated column in SharePoint. Due to the fact that you can use HTML code in SharePoint calculated columns, you can apply color coding to your text, fonts, bullets, etc. I am using large bullets that look like traffic lights to enhance the visual effects of my List. This technique can also be used in other areas but for this article I will only focus on color coding SharePoint Lists.
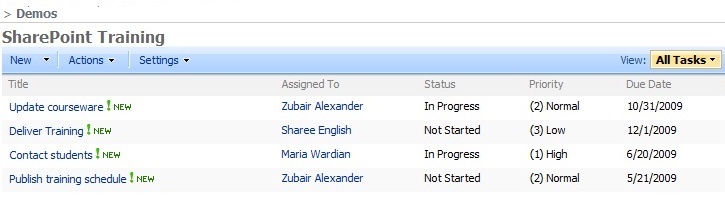
NOTE: If you are a newbie to SharePoint and are not quite familiar with SharePoint Lists, creating columns, the concept of calculated columns, Web parts, or HTML code you may not be able to take full advantage of techniques described in this article. Those of you who are familiar with SharePoint, this will be a piece of cake. If you are relatively new to SharePoint, I will still try my best to keep things simple so you can benefit from this article.
Here are the step-by-step instructions on how to apply color coding to your SharePoint Lists. 1. Create a SharePoint List, e.g. Tasks, or use an existing List. 2. Add some tasks to the List. Add at least one item with a low, medium, and high priority. The more the better. Something similar to this. 3. Create a new column (Go to your List and then click Settings, List Settings, Create column) and use a Column name of your choice. I called my column Priority Status but you can choose any other name that is not already in use by SharePoint. 4. For the type of information in the column select Calculated (calculation based on other columns). 5. Enter a description. 6. In the Formula box enter the following HTML code and then click OK to create the column. =”<DIV style=’font-weight:bold; font-size:24px; color:”&CHOOSE(RIGHT(LEFT(Priority,2),1),”red”,”orange”,”green”)&”;’>&bull;</DIV>” 7. If the column was created at the top-level site then you need to add the column to your List. If you created the column at the List level then it will be already added to your List. 8. If necessary, modify the view for your List and select the new column that you've just created. This may be necessary if you unchecked the box that says Add to default view when you created the column. In my case I added the Priority Status column to my List called SharePoint Training. 9. At this point if you look at your List it will look like this. 10. I know, that's not exactly what you want. Now we will add a Web part that will magically get rid of the HTML code and replace it with what we want. 11. Edit the page and add the Content Editor Web Part. The Web Part should be added to the bottom of your page. If it's not, move it to the bottom. 12. Modify the Content Editor Web Part. 13. In MOSS 2007, click on the Source Editor button (not the Rich Text Editor).
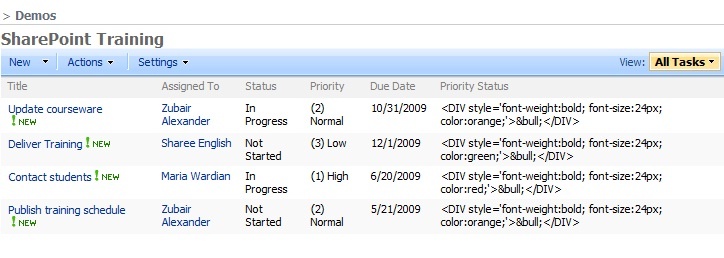
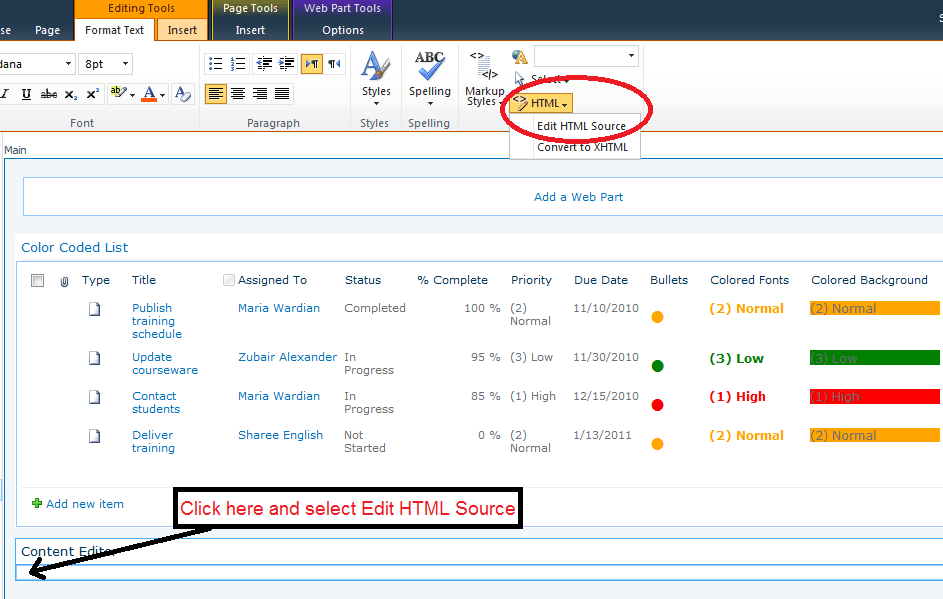
In SharePoint Server 2010, click anywhere in the Content Editor Web Part and then on the ribbon click Edit HTML Source. When you close the source code window, you will not see any text in the Content Editor Web Part because the code only contains a JavaScript.
14. Download and unzip this file convert2html.zip, copy the code from the file, paste it into the Source Editor window and then click Save. 15. Click OK and then exit the editing mode. 16. Go to your List. The content should look something similar to this. Additional Options If you would like to apply color coding to fonts, create a new column and use the following code in step 6. =”<DIV style=’font-weight:bold; font-size:12px; color:”&CHOOSE(RIGHT(LEFT(Priority,2),1),”red”,”orange”,”green”)&”;’>”&Priority&”</DIV>” If you would like to change the background color, create a new column and use the following code in step 6. =”<DIV style=’font-size:12px; background-color:”&CHOOSE(RIGHT(LEFT(Priority,2),1),”red”,”orange”,”green”)&”;’>”&Priority&”</DIV>” The following screenshot shows all three options. Troubleshooting If your text is not getting converted to HTML  then go back and verify that you've followed all the steps as I have documented. One of the most common reason for failure is that people tend to copy code directly from a Web site and paste it into an HTML editor, rather than copying and pasting it from an ASCII text file. Copying code in that manner can potentially add additional formatting and "junk" to the code and cause your code to not work as expected. Sometimes you can copy the text from the Web page, paste it into a text editor (like Notepad), clean it up if necessary,  and then paste it into your HTML editor. Another reason for failure is typos. Watch your code, especially when you copy and paste. If you can't find the column that you've created earlier it could be because you created the column in the wrong List or Library. If you create a column in one List it won't be available in another. Therefore, I recommend that you create all your columns in the top-level site, as I mentioned earlier, so they are accessible in all the Lists and Libraries in all the sites and subsites. I have to keep on stressing this because my students tend to forget this at times. If you are trying to add the Content Editor Web Part and it doesn't add it to your page, make sure that you are using Internet Explorer. Although Microsoft claims that Mozilla Firefox is a "supported" platform for SharePoint, anyone who works with SharePoint is aware that it is not exactly the case. You can use IE tab add-on in Firefox to make some things work but when in doubt switch to Internet Explorer. Having said that, I should also warn you that there are several instances where I can't get SharePoint to do what I want when I am using Internet Explorer and switching to Firefox gets the job done. Go figure. So the moral of the story is that you may have to switch between Internet Explorer and Firefox when working with SharePoint but my recommendation is to use Internet Explorer as much as possible, especially when doing administration work. If your formula is not working, try adding a sold bracket around the column name. For example, add brackets around Priority. =”<DIV style=’font-weight:bold; font-size:24px; color:”&CHOOSE(RIGHT(LEFT([Priority],2),1),”red”,”orange”,”green”)&”;’>&bull;</DIV>” Conclusion Using this technique you can do a whole lot more than what I have shown you in this article. Using HTML code in calculated columns opens a whole new world to you. Once you've learned this trick, I am sure you will come up with several new ideas to enhance your SharePoint content. The best thing about this technique is that it doesn't require SharePoint Designer 2007 or any other custom Web parts so an end user can apply color coding to SharePoint content using this method. I originally wrote this article for MOSS 2007. This technique also works in SharePoint Server 2010. Updated: March 19, 2012
Copyright ©2009 Zubair Alexander. All rights reserved.