[responsivevoice_button voice="US English Male" buttontext="Listen to Post"]
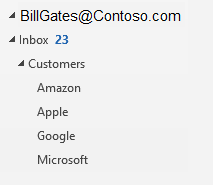
Microsoft Outlook is a popular messaging application used by millions of users across the world. When you work with dozens, if not hundreds, of folders in Outlook, you want a simple way to customize them to your liking. One way to easily customize the folders is by applying custom views. You can then apply your custom view to some or all of the folders in Outlook. For example, you can customize the view of the Inbox folder and then apply it to all the folders under Inbox, or you can apply the view to a folder, such as Customers in the image below, and all the subfolders under Customers.
That sounds pretty simple, and it is, but unfortunately once in a while you run into a situation where the customized view just won't apply to the subfolders.
Problem: Custom View Won't Apply to All Other Folders
You may discover one day that when you apply the view, the change doesn't stick.......Outlook resets it back to the default view, which is based on the
Compact view. This can be a frustrating experience. There are several scenarios that cause this situation. However, in this article I won't go into the reasons why you may lose your custom views, I will just focus on how you can apply the custom views across all your folders in Outlook and prevent the changes from reverting back to their default settings without your approval.
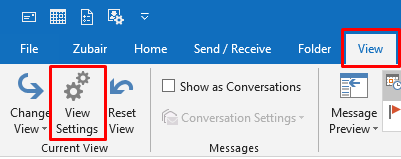
First let me show you how to customize a view and then I will talk about the solution for the problem.
Customizing and Managing Outlook Views
The default view (called
Compact) in Outlook is automatically applied to all the new folders you create in Outlook. You can customize a view for a folder by first selecting the folder (e.g. Inbox), then selecting
View Settings button on the
View tab.
NOTE: The screenshots used in this article are from Microsoft Outlook 2019. As you can tell the menu has been customized because it has a tab with my name, which is a customized tab I used that has all the Outlook items I want to use. It save me time from switching tabs in Outlook.
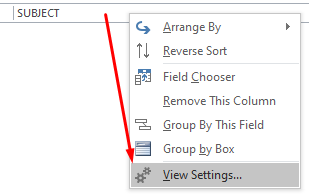
You can also right-click the column heading in a folder and select the option to
View Settings. Make sure you right-click inside the column heading between the two horizontal lines.
Click
Columns to add or remove the columns in your view.
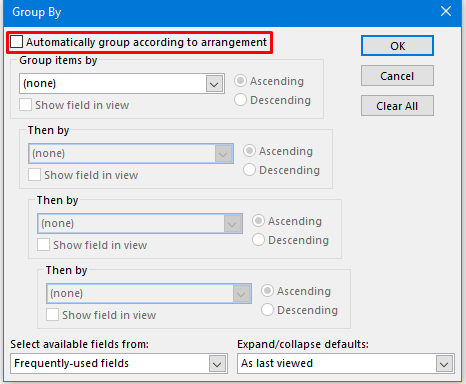
As you can see, there are many options in Advanced View Settings. You can use
Group By to customize the grouping of items. For example, if you don't want to arrange the emails under separate group headings, clear the box
Automatically group according to arrangement.
You can also customize a view and save that view as your own custom view, or you can apply the current view to other mail folders.
Managing Views in Outlook
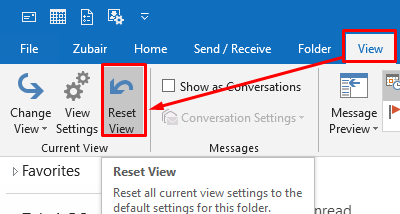
I like to change the default
Compact view and apply it to all the other existing folders in Outlook so that whenever a new folder is created, it automatically contains the settings that are based on the Compact view. To change the Compact view, Go to
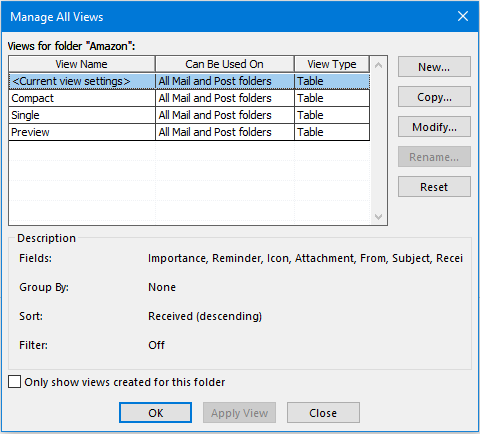
View tab -> Change View -> Manage Views. You will notice that whenever you click the
Change View drop-down button, Compact is always selected (highlighted in gray). This is where you can manage all your views.
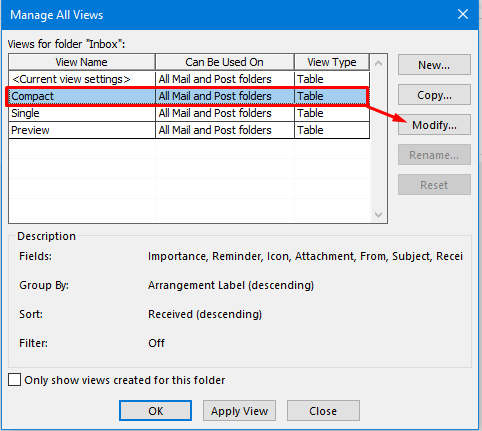
Highlight the
Compact view and then click
Modify. You will make changes to this view because it's the default view.
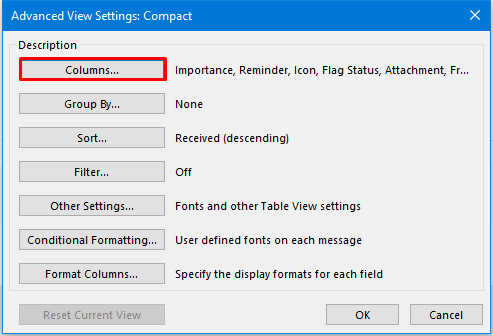
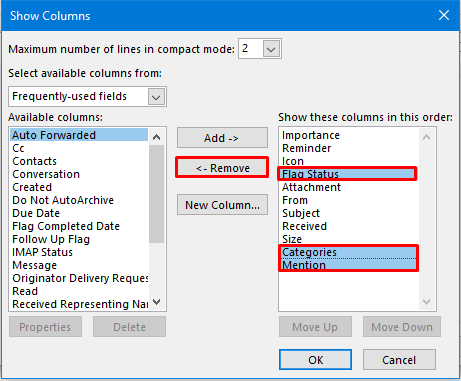
Click
Columns.
Control-click to select the columns
Flag Status,
Categories, and
Mention, then click
Remove.
Click
OK twice and then click
Apply View. Do not forget to click Apply View. Because Compact view was selected, you are applying the changes to that view so they can be propagated everywhere in Outlook.
Repeat the above steps for changing Compact view, but this time modify the
Group By settings by clearing the box
Automatically group according to arrangement.
Click
OK twice and then click
Apply View. It's important that you click Apply View because changes are automatically applied to the folder you are in (Inbox in our case) and if you forget to click Apply View, your changes won't be propagated to any other folder in Outlook.
If you poke around in different folders, you will notice that your custom view has been applied to all the folders in your Exchange profile. If you have any PST files added to your profile, the new view is applied to all the folders and subfolders in them as well. That's because you changed the Compact view, which is the default view.
Now that you know how to manage the views, let get back to the solution.
SOLUTION: Reset the Views and Then Apply the Views
Once you have customized the columns in one or more folders, e.g. changed the Group By options, column size, or column formatting, you may not be able to apply the default (Compact) view to all the folders. I am sure there are some other solutions out there to work around this issue, but the quickest and easier solution that works for me is this.
- Reset the default Compact view in Outlook
- Customize the default Compact view to your liking
This will reset the original default view to your custom view. There are some folders that don't use the Compact view, these include Sent Items and Outbox folders. You can manually change the view for these folders.
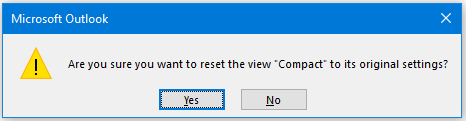
1. Reset the default Compact view in Outlook
When prompted
Are you sure you want to reset the view "Compact" to its original settings?, select
Yes.
This will reset the default Compact view to its original setting so all your views in Outlook will be rest for not only the Exchange Inbox and all the subfolders, but if you have any PST files added to Outlook, it will also reset their folders. You can either close the PST file(s) before resetting the Compact view, or apply your custom view to PST files just like you will to the Exchange Inbox and its subfolders.
2. Customize the default Compact view to your liking
Follow the instructions in the section
Managing Views in Outlook above to customize the default Compact view. I do this by first selecting the
Inbox and then customize my columns, groupings, etc. to modify the Compact view. At this point all the folders should have your custom view applied to them, with the exception of Sent Items, Outbox, and possibly a couple of others. Manually customize the views as necessary for these exceptions.
Applying Custom View to Specific Folders
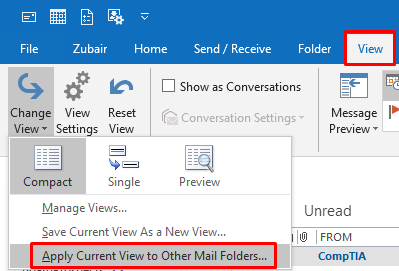
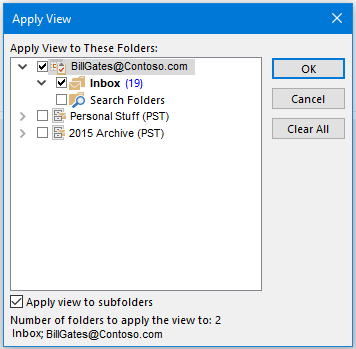
If you want the custom view applied only to specific folders then don't change the Compact view. Create your own view and apply it to specific folders. First make sure you are in the Inbox and then go to
View -> Change View -> Apply Current View to Other Mail Folders.
You will see the options to select the folders to which you want to apply the view. Select the folders. You can also select the folders in PST files if you want.
Click
OK and you will see the view applied to the selected folders.
Summary
Managing views in Outlook seem like a simple task, but they're anything but simple. Once you make changes to the views in folders, you may not be able to apply your view across all the folders. Now that you know how to reset the views, you can quickly and easily apply your custom view globally. You can still have different views in different folders, it's just that once you have different views, you won't be able to apply a view globally again unless you reset the Compact view. That's the key because Compact view is the default view so you can apply the default view globally and then customize individual folders as needed. Hopefully some day managing views in Outlook would be simple and would work the way you expect them to. That day is not here yet.
| Thanks for reading my article. If you are interested in IT training & consulting services, please reach out to me. Visit ZubairAlexander.com for information on my professional background. |
Copyright © 2020 SeattlePro Enterprises, LLC. All rights reserved.