Excel Services in MOSS 2007

Excel Services is one of the coolest features in Microsoft Office SharePoint Server (MOSS) 2007. The primary purpose of Excel Services is control, secure, and manage access to Excel workbooks. Microsoft defines Excel Services as an enterprise-class application server that allows rendering of workbooks (.xslx, xslb), and it enables you to easily reuse workbook components, such as charts and PivotTable reports, that can be rendered in business intelligence dashboards.
For security purposes, Excel Services only processes connections that use trusted data providers. Luckily, most common data connections are already trusted by Excel Services, such as ODBC, OLEDB, SQL Server, and OLAP. You would only need to add additional data providers for custom solutions.
In this article. I am going to demonstrate how you can take advantage of some of the functionality offered by Excel Calculation Services.
Displaying Excel Spreadsheets as Web Pages in Browser
There are several ways to utilize Excel Services in MOSS 2007. For example, you can display Excel spreadsheet as a Web page in your browser. Simply create a document library, go to Document Library Settings, click Advanced settings, and under Browser-enabled Documents check the box “Display as a Web page” and click OK. I use Office Ultimate 2007 which allows publishing to Excel Services. To publish a spreadsheet to a certain Document Library, click the Office button, click Publish, and then select Excel services.
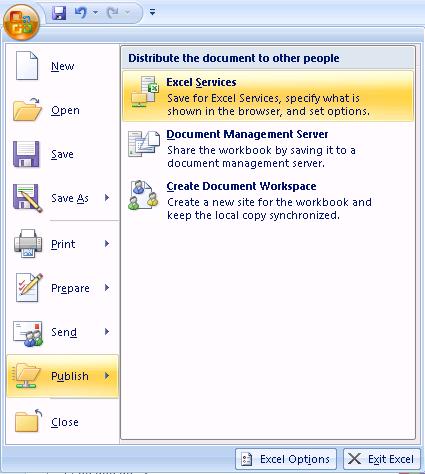
You can also upload the spreadsheet to a Document Library and when you open the spreadsheet, it will display it in your browser. Here’s the step-by-step-procedure.
NOTE: If you are a Site Owner and do not have the appropriate permissions to access Central Administration site, your SharePoint administrator needs to perform the following steps on the Microsoft Office SharePoint Server (MOSS) 2007 before you can take advantage of the Excel Calculation Services functionality.
Configure Excel Calculation Services
1. Start the Central Administration site.
2. Go to the Shared Services Provider (SSP) Administration site for the Web application that’s hosting the Web site.
3. Under Excel Services Settings click Trusted file locations.
4. Click Add Trusted File Location. Unless Trusted File Location is configured in SharePoint, Excel Services will not work.
5. In the Address box type the URL to the trusted file location, e.g. http://www.contoso.com/SharedDocuments/Forms/AllItems.aspx.
Create Excel Spreadsheet
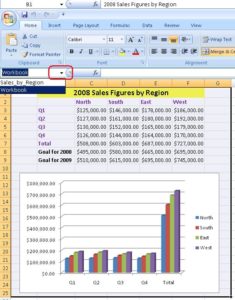
6. Create an Excel Spreadsheet. I created a spreadsheet that I am going to use as a a sample. Excel Services allow exposing named cells in a spreadsheet as parameters when you publish then in SharePoint.
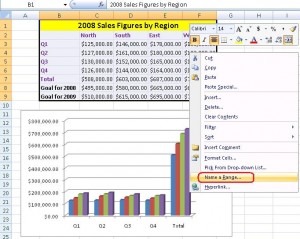
7. To configure named ranges, highlight an area in the spreadsheet, as shown below, right-click and select Name a Range.
8. You can view all the named ranges by clicking on the drop-down button in the upper left hand corner, highlighted in red below.
Another option is to use the Defined Names area (on Formulas tab) on the Office ribbon. This section also contains Name Manager that you can use to manage all the named ranges.
9. Save and upload the Excel file to a Document Library.
Display Excel Content as a Web Page
10. In the Document Library, click on Settings, Document Library Settings, Advanced settings (located under General Settings).
11. Under Browser-enabled Documents, check the radio button “Display as a Web page” and then click OK. The default option opens the spreadsheets in Excel. However, if a user doesn’t have Excel on their computer, you can display the spreadsheet in a Web page.
Users will now be able to view Excel spreadsheet content in their Web browsers, even if they don’t have Excel installed on their computer. However, they will not be able to edit the data because it is not in an Excel spreadsheet format, it is simply displayed as a Web page.
Let’s look at another option that Excel Services offer. This option will allow us to display Excel content directly in a Web part.
Displaying Excel Spreadsheet Content in a Web Part
Displaying Excel data on a Web page can come handy but displaying content in a Web part can be even more useful. There are several advantages to this technique but perhaps the biggest advantage is that you can simply modified the content in an Excel spreadsheet and the content displayed in the Web part can be quickly updated. SharePoint can display data in columns but does not have the ability to display certain types of content, such as charts. Imagine having an Excel chart that can not only be displayed in SharePoint, it can be dynamically updated by modifying the Excel chart in a spreadsheet.
The following step-by-step procedure demonstrates how you can display content in an Excel spreadsheet directly in a SharePoint Web part.
1. Perform steps 1-10, if you haven’t already.
2. In step 11 above the assumption was that clients do not have Excel installed on their computers and therefore we checked the box “Open in the client application.” Now we will assume that the clients have Excel on their computers, which is the more likely scenario, so let’s check the box “Open in the client application.”
3. Add a Web part to the page you are working with.
4. Select the Excel Web Access Web part under the Business Data section and click Add.
5. Open the tool pane by clicking the link “Click here to open the tool pane.”

6. In the Workbook box click the browse button and add the Excel spreadsheet. In my example I added the workbook called “Sales by Region – 2008”. You can either use URLs or UNC in this box. I typically use URLs.
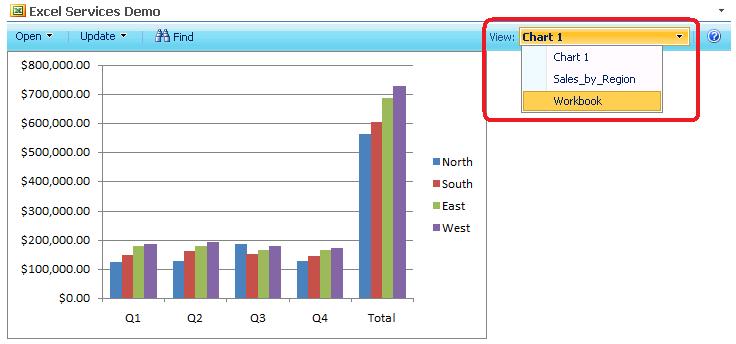
7. You can enter the name of a defined region that you want it loaded as default in Named Item box. For example, I typed the name Chart 1 as my default named range so when you refresh the page Chart 1 will be displayed.
8. You can modify the title of the Web part under Appearance if you want.
9. Click OK to apply the changes.
10. If you get the following Access Denied error, see the troubleshooting section in this article for more details.
You do not have permissions to open this file on Excel Services.
Make sure that the file is in an Excel Services trusted location and that you have access to the file.

11. At this time you should be able to see the content of your Excel spreadsheet in a SharePoint Web part, thanks to Excel Calculation Services and Excel Web Access Web part. You can select a different Named Range from the View drop-down menu to modify the view.
Troubleshooting
Access Denied Error
One of the more common errors that you might see is the Access Denied error. If you try to open an Excel workbook in the Web part and get Access Denied error, there are several things you can do to fix the problem.
NOTE: If you are a Site Owner or a Business Manager who doesn’t have access to the MOSS 2007, you’ll need help from your administrator because these steps need to be performed on the server.
1. Make sure that the Excel Services have been started for the SSP that is configured for the Web application you are working with.
2. Go to the SSP and click Edit Excel Service settings under the Excel Service Settings section. If you are using Impersonation for the File Access Method, switch to the Process account instead. The File Access Method is used by Excel Calculation Services to retrieve workbooks from all non-Windows SharePoint Services trusted file locations. Impersonation accesses the files as the end user account. Process account accesses the files as Excel Calculation Services process account. If this change doesn’t make a difference, switch the setting back to the default.
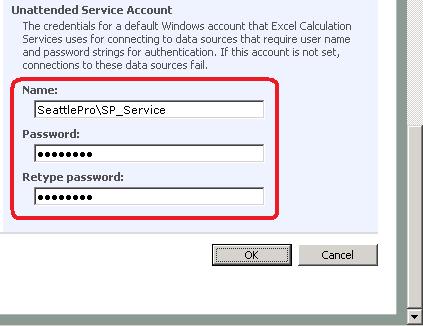
3. Depending on the type of authentication you are using, you may want to configure the Unattended Service Account under the External Data section of Excel Services settings. The Unattended Account is a special account used by Excel Services when it tries to authenticate to a data source that is not using Integrated Windows authentication. This account is used to connect to data sources that require authentication, without this configuration the connections to the data source can fail. In general, keep in mind that you’ll only need to configure unattended account if you want to enable connections that have their authentication set to either None or SSO (Single Sign-On), where the SSO application ID is not using Windows credentials. When you configure this account, enter it in the format Domain\AccountName, as shown below.
4. Yet another reason for this error could be related to the Trusted file location. Go to the Trusted File Location (located in SSP Administration site under Excel Services Settings section. Check the Children trusted box under Trust Children. Location type should be Windows SharePoint Services.
5. When you add the location of the Trusted File Location you may have to try a few different tricks. If the full path is not working, try using only the name of the Document Library. You can also try adding the path to the entire SharePoint site. If you are working with a subsite and or if in general the URL has a space, you may need to enter %20 in place of empty space.
6. If the file is uploaded to a SharePoint library and you are pointing to a file in the library, make sure that your Location Type is set to Windows SharePoint Services, not UNC or HTTP. For example, let’s say you want to add path to a subsite called Training in the SeattlePro1.com domain. You will enter the URL http://www.seattlepro1.com/training in the Address box and then leave the Location Type to the default Windows SharePoint Services. Keep in mind that you can add multiple Trusted File Locations if you want.
Miscellaneous
1. On the Trusted File Location page verify that your workbook is not larger than the default value of 10MB. By default, Excel Services cannot open Excel files that are larger than 10MB. Change the Maximum Workbook Size setting under Workbook Properties accordingly. The allowed values range between 1 and 2000 in MB.
2. If you are displaying a chart, keep in mind that by default Excel Services can only open charts that are no larger than 1MB in size. You may have to adjust this setting to display the chart.
Copyright ©2009 Zubair Alexander. All rights reserved.


Hi,
I just installed a 180 days trial version of MOSS’07 on my server. After the installation is complete, I don’t see a “Excel Services Settings” under my SharedServices1 link. Do you have any idea what could be going on?
Thanks in advance.
Regards,
Saeed Fattahi
Saeed,
You may have MOSS 2007 Standard Edition. Excel Services requires MOSS 2007 Enterprise Edition. If you already have Enterprise Edition then you need to make sure that you have created a Shared Services Provider (SSP). Check out Microsoft’s document “Determine resource requirements to support Excel Services” at http://technet.microsoft.com/en-us/library/cc263500.aspx for more information.
Good luck!