How to Configure Regional Settings in SharePoint Server 2010

SharePoint Server 2010 uses several regional settings, such as Locale, Sort order, Time zone, Calendar, Time format and Currency. Here’s a description of these settings.
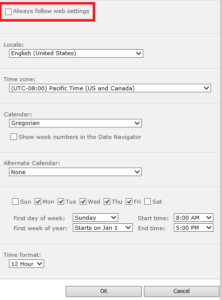
Locale: The Locale setting controls numbering, sorting, calendar, and date and time formatting for the Web site.
Sort order: This option controls the sort order for lists and libraries.
Time zone: The Time zone setting lets you select the time zone that is appropriate for your location, such as Eastern Time zone.
Calendar: This option lets you select the type of calendar you want to use. For example, in United States we use the Gregorian calendar. In Japan you may use Japanese Emperor Era calendar.
Work Week: You can define the work week for your calendar, such as Monday through Friday.
Time Format: You can select from 12 Hour or 24 Hour format. For example, the military uses 24 Hour format.
Currency: You can also set your currency settings, which are configured on the Create Column page when you are working with lists. Technically, Currency is not a regional setting but because it is tied with the regional settings it is often considered a regional setting. The default value of the currency depends on the locale that you specify in your regional settings.
There are three places where you can configure the regional settings in SharePoint Server 2010. Let’s take a closer look at these settings.
- Web Application level (requires access to Central Administration).
- Site level (requires Site Administrator permissions).
- User level.
Web Application Level
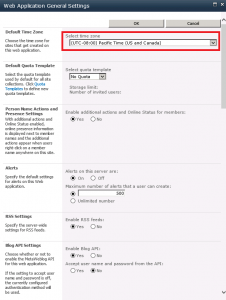
- Go to Central Administration -> Application Management -> Manage web applications.
- Select the Web application and then on the ribbon click General Settings and from the drop-down menu select General Settings again.
- Select the appropriate time zone for your Web sites and then click OK. These settings will apply to any new sites that you create within this Web application. Existing sites are not affected.
Site Level
You can override the Web application level regional settings with the site level settings. You need to be a site owner to perform this action.
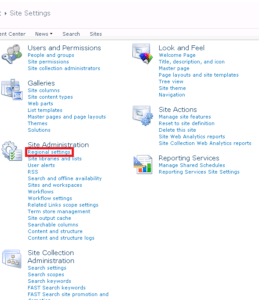
- Go to the site for which you want to change the regional settings.
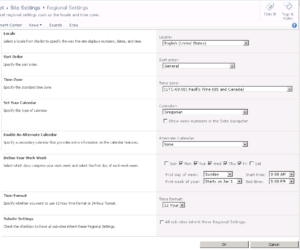
- Go to Site Actions -> Site Settings -> Site Administration -> Regional settings.
- Select the appropriate regional settings for your region, such as Locale, Sort order, Time zone, Calendar, Alternate Calendar, and Time format and then click OK.
User Level
If the Web application and site level regional settings are not appropriate for users at different locations, such as different time zones, they can set their own regional settings.
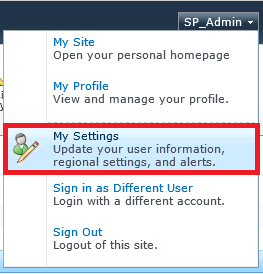
- Login to the SharePoint site with your user account.
- Click on the Open Menu in the upper right-hand side and select My Settings.
- Click My Regional Settings.
- Uncheck the box Follow web settings and then select the appropriate setting, such as Locale, Time zone, Calendar, Alternate Calendar, and Time format and then click OK.
- You should now notice your new regional settings applied to your content. For example, if you upload a file it will display your local time and not the time set at the site or Web application level.
Copyright ©2013 Zubair Alexander. All rights reserved.
