How to Fix Slow Access to Network Shares
[responsivevoice_button voice="US English Male" buttontext="Listen to Post"]
Last year I wrote this article "What to Do When Creating Folders or Accessing Files on Remote Computer is Very Slow." In that article I mentioned several troubleshooting techniques and tips on fixing the issue of slow network access to shares. In this article, I will share another method to address the issue. After I had fixed the issue last year. I started to have the same problem again. This time I used the following registry modification to fix the issue. The problem was related to the SMB2 cache redirection as explained by Microsoft in the article SMB2 Client Redirector Caches Explained.PROBLEM
Access to network files and folders is very slow. The network drives are mapped in Windows 10, Windows 8, or Windows 7.SOLUTION
Here's the step-by-step procedure on how I was able to resolve the issue. I was using Windows 10 Pro on the computer that was having the issue and that's where the following change should be made to the registry. The network shares were also on a Windows 10 Pro desktop, but the registry change needs to be made on the computer which is experiencing slow access, not the one that's hosting the network shares.| WARNING! This solution requires modifying the registry. Modifying the registry is like doing a brain surgery on the computer. Only trained individuals who know what they are doing should modify the registry. The information in this article is for reference only. Modify the registry at your own risk. |
- In Windows Search box type regedit and press Enter to access the Registry Editor.
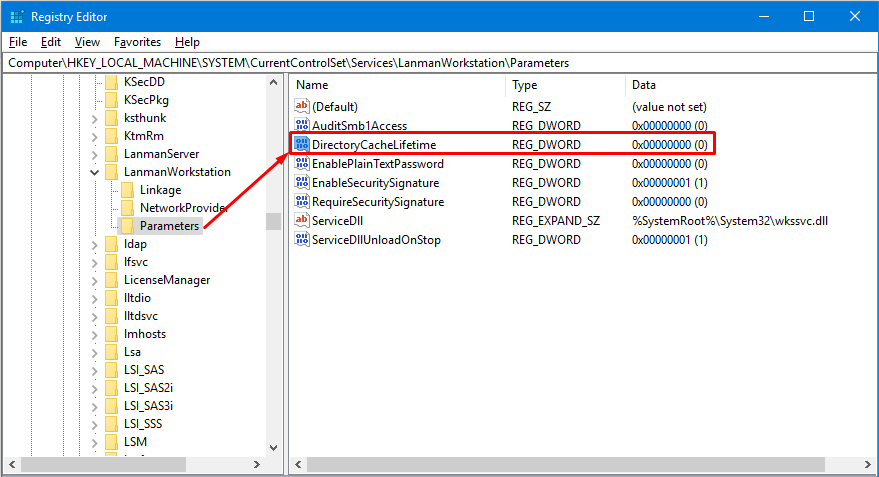
- Go to HKEY_LOCAL_MACHINE and locate System\CurrentControlSet\Services\Lanmanworkstation\Parameters.
- Create a new DWORD value for DirectoryCacheLifetime.
- Double-click the value and set it to zero (0).
- It's not necessary to disable additional caches, but if the above setting doesn't fix the problem, then you may want to disable two additional SMB cache values. One for FileInfoCacheLifetime and another for FileNotFoundCacheLifetime. You need to add both of them as type REG_DWORD and set the value zero (0) to disable them, if they don't already exist in the registry.
| WARNING! It's possible that you may experience a significant performance hit by disabling these caches. If that's the case, simply re-enable these caches by deleting these registry keys. Deleting them will set it back to their default values, or you can manually change the values to their default settings. The default values are supposed to work for most scenarios, but that's not always the case. |
| Thanks for reading my article. If you are interested in IT training & consulting services, please reach out to me. Visit ZubairAlexander.com for information on my professional background. |
Copyright © 2018 SeattlePro Enterprises, LLC. All rights reserved.
Leave a Comment