How to Increase Virtual Machine Disk Space in VMware ESXi 4.1

If you are running VMware ESXi 4.1 you can increase the size of the virtual machine (VM) relatively easily once you know how. But if you have any snapshots, it can be a pain. Keep in mind that increasing the size of the VM is different than increasing the size of the disk partition on the host computer.
Let’s use the following scenario as an example. Your ESXi server’s hard disk is 1TB in size and you have a VM running a Windows Server 2008 R2 guest operating system that has two drives, a 30GB drive C and a 20GB drive D. After a few months you realize that you have installed a lot of programs and your VM hard disk is running out of space. Over the last few months you have taken a dozen snapshots. You go to the vSphere Client utility and select the VM. You select Edit Settings and select the hard disk that is running out of disk space but the option to expand the disk is grayed out. This is likely if the VM has snapshots. You must power off the VM and then delete the snapshots before you can expand the disks.
Once that is take care of, you need to edit the VM’s settings. Here are the steps.
NOTE: The option to Edit Settings will be grayed out if you are in the middle of deleting a snapshot.
- Make sure your ESXi 4.1 server has been backed up.
- Start the vSphere Client utility.
- Select the VM that’s running out of disk space.
- Right click the VM and select Edit Settings.
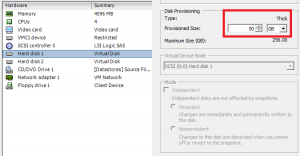
- On the Hardware tab select the virtual hard disk (e.g. Hard disk 1).
- On the right hand side, under Disk Provisioning increase the Provisioned Size then click OK. For example, if you have two disks and you want to increase the size for drive C from 30 to 50GB and drive D from 20 to 25GB, increase the size using the up arrow and then click OK.

- Restart the VM.
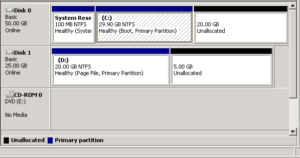
- At this point you have increased the size of the disk in VMware but you need to do the same in the operating system. In Windows Server 2008 R2 go to Server Manager, Storage, Disk Management. You will notice unallocated space at the end of the disks.

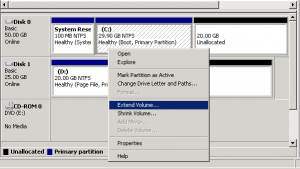
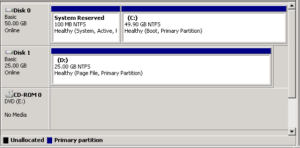
- Right-click drive C and select Extend Volume. Follow the wizard to extend the volume. It should take only a few seconds to run through the wizard. Repeat the steps for drive D.

- Your drive size will increase right away and there is no need to reboot the computer.

Troubleshooting VMware Snapshots Issues
If in step 6 you are unable to increase the size of the disk because the provisioning option is grayed out, you need to make sure that you delete all the existing snapshots. VMware snapshots are very different than Hyper-V snapshots. Frankly, they are much more complicated and are meant to be used only temporarily. You heard me right. Unlike Hyper-V snapshots which can be actually useful in the long term because you can keep a bunch of snapshots indefinitely and go back and forth between them without any problem, VMware is not designed to use snapshot for similar purposes. It is meant to be used for 24-28 hours after which you should delete them. If you don’t, you can run into some serious problems. First of all, deleting snapshots takes seconds or a couple of minutes in Hyper-V. In VMware it can take hours. If you have a 30GB VM disk and you have old snapshots that you didn’t delete within a couple of days, it can take anywhere from an hour to several hours to delete each snapshot. And that’s not the bad news. What’s worse is that VMware is infamous for hanging at 95% (or sometimes at 99%) when you delete a snapshot. On my ESXi server it always hangs at 99%. Sometimes if you wait a few hours it may finish the process. Other times you can wait over 12 hours and it will still be stuck at 95% (or 99%). This is a known issue with VMware for some time now. Do an Internet search for “VMware stuck at 95%” and see how many hits you get.
VMware can get stuck not just when you delete the snapshots (a common occurrence) but also when you shutdown or power off the VM. Although this problem is relatively uncommon. To work around this problem, you can either use SSH to connect to your server and restart the Management Agents, or you can go to your VMware server’s console and restart the services. Here are the steps as documented by VMware in this KB article.
Restart Management Agents Using SSH
- Logon to the ESXi host as root.
- Type service mgmt-vmware restart and press Enter.
- Type service vmware-vpxa restart and press Enter.
- Type logout and press Enter to disconnect from the ESX host.
Restart Management Agents Using the Console
- Connect to the console of your ESXi host.
- Press F2 to customize the system.
- Login as root.
- Using the Up/Down arrows navigate to Restart Management Agents.
- Press F11 to restart the services.
- When the service has been restarted, press Enter to exit.
- Press ESC to logout of the system.
If you are deleting one snapshot at a time you may have to repeat the above step for restarting the Management Agents each time when the snapshot hangs at 95%.
The quicker way to delete the snapshots is to use the Delete All option. Depending on how old the snapshots are, the size of the snapshots can be large and it can take considerable time. If you notice that you have deleted all the snapshots and the provisioning option is still grayed out, this is because the snapshots are not actually deleted, even though there is nothing in the Snapshot Manager. You can browse the Datastore and see all the snapshots. If you run into this issue, try the following tips.
Tip #1
Create a snapshot and then delete it right away. This may delete all the existing snapshots and you will be able to provision the disks.
Tip #2
Power down the VM, create a snapshot and the delete it right away. I have experienced that when the first technique doesn’t work, the second one does.
Moral of the Story
Do not use snapshot in VMware ESXi 4.1 for more than 1-2 days. Use snapshots temporarily, not as a method to backup or to go back and forth between snapshots. If you are a developer, trainer or a tester that needs to use snapshots on a consistent basis then consider switching to Microsoft Hyper-V as a solution. While Hyper-V’s snapshots have their own issues, they are not quite as problematic as in VMware.
Copyright ©2011 Zubair Alexander. All rights reserved.


Excellent article. I’ve read many articles that proposed to increase the disk size using command shell prompt, but I saw the figure in step 9 and it all became clear.
Thank you very much. It’s very informative and so useful.