PowerShell Script to Enable or Disable Network Adapter at Startup or Logon in Windows 8 and Windows Server 2012

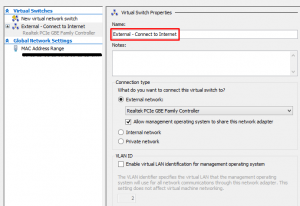
I run Hyper-V on my Windows 8 Enterprise desktop. One of the issues that I have encountered has to do with the virtual Ethernet adapter. My virtual machines can connect to the Internet fine but every time I restart my host computer I lose network connectivity. To gain network connectivity back I have to re-enable (first disable and then enable) the virtual Ethernet adapter (vEthernet) and everything works fine on the virtual machine and the host computer. Here’s what my Virtual Switch settings look like.
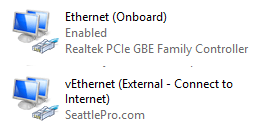
The adapters on my computers include an onboard Ethernet adapter and a virtual Ethernet adapter, as shown below. Notice that they are no longer called Local Area Connection1 and Local Area Connection2, etc. in Windows 8. They are simply named Ethernet and if you have a wireless Wi-Fi connection, it will be called Wi-Fi.
The purpose of this article is not to discuss the Hyper-V issues on Windows 8, although that can be a good topic for a future post, the purpose here is to talk about using PowerShell to automatically disable and enable the network adapter either at startup or at logon. The PowerShell solution has two advantages:
- Saves time from manually disabling and then enabling the vEthernet adapter each time the computer is started.
- Allows running RDP to connect to the computer even if the computer has been rebooted. Obviously, if the computer reboots I normally cannot access it remotely with RDP because there is no one at the console to disable and then enable the vEthernet adapter.
Problem
Virtual Ethernet adapter (vEthernet) on Windows 8 needs to be disabled and then enabled at startup or logon.
Solution
Use PowerShell to automate the process of disabling and enabling the network adapter.
PowerShell is a very powerful tool that can be used to easily manage network adapters. Among other things, you can also enable or disable network adapters. To get a listing of all your network adapters use the following PowerShell script.
NOTE: Get-NetAdapter cmdlet does not seem to be supported in PowerShell 2.0. You can upgrade PowerShell 2.0 (e.g. if you are running Windows 7) to PowerShell 3.0 following these instructions. If you are unsure of the PowerShell version that you are running, use the command Get-Host|Select-Object version, or use $PSVersionTable to get much more information.
You could also use Get-NetAdapter -Name vEthernet* to get a listing of all virtual Ethernet adapters. I am not an expert in PowerShell but I have noticed that if there is a parenthesis in the name of the adapter the PowerShell script won’t work with that adapter. However, if I use vEthernet* then I can take an action on the virtual adapter. Regardless of what name you use for the connection in the virtual switch manager, the system adds the name of the connection in parenthesis. For example, if your external adapter is called Internet, the name of your vEthernet adapter will be vEthernet (Internet). And no, you cannot have an adapter without a name so there is no way to avoid parenthesis in the name.
Managing Network Adapters with PowerShell
You can look at only the adapters that are enabled or disabled by using the following commands. The vertical bar is the pipe symbol (located above the ENTER key on most keyboards).
Get-NetAdapter | where adminstatus -eq “up”
Get-NetAdapter | where adminstatus -eq “down”
To get all the details about the network adapter use the following command. This will give you all the details about the virtual Ethernet adapter(s), pipe the output into Format-List cmdlet and finally pause the output to make the output more readable by scrolling one screen at a time. You can use the spacebar to scroll one screen at a time or use the enter key to scroll one line at a time.
Get-NetAdapter -Name vEthernet* | fl * | more
If you want to know just about everything about every adapter (physical, virtual, wireless, etc.) then use the following command. Just use the spacebar to jump to the next screen.
Get-NetAdapter -Name * | fl * | more
Creating a PowerShell Script
I created the following PowerShell script in Notepad and then saved it as Disable-Enable-vEthernet-Adapter.ps1.
Get-NetAdapter -Name vEthernet* | Disable-NetAdapter -Confirm:$false
Get-NetAdapter -Name vEthernet* | Enable-NetAdapter
The first command disables the virtual Ethernet adapter and the second command enables it. Make sure that when you save the file the Save file as Type is set to All files (*.*), otherwise the file will be saved with .txt extension as a text file.
In one of the forums I found this script that allows you to elevate the privilege and run the script as an Administrator. I added this to the beginning of my script.
function Test-Admin {
$currentUser = New-Object Security.Principal.WindowsPrincipal $([Security.Principal.WindowsIdentity]::GetCurrent())
$currentUser.IsInRole([Security.Principal.WindowsBuiltinRole]::Administrator)
}if ((Test-Admin) -eq $false) {
if ($elevated)
{
# tried to elevate, did not work, aborting
}
else {
Start-Process powershell.exe -Verb RunAs -ArgumentList (‘-noprofile -noexit -file “{0}” -elevated’ -f ($myinvocation.MyCommand.Definition))
}exit
}‘running with full privileges’
param([switch]$Elevated)
Final Script
Here’s what my final script looks like. I saved the file in Notepad and called it Disable-Enable-vEthernet-Adapter.ps1.
param([switch]$Elevated)
function Test-Admin {
$currentUser = New-Object Security.Principal.WindowsPrincipal $([Security.Principal.WindowsIdentity]::GetCurrent())
$currentUser.IsInRole([Security.Principal.WindowsBuiltinRole]::Administrator)
}if ((Test-Admin) -eq $false) {
if ($elevated)
{
# tried to elevate, did not work, aborting
}
else {
Start-Process powershell.exe -Verb RunAs -ArgumentList (‘-noprofile -noexit -file “{0}” -elevated’ -f ($myinvocation.MyCommand.Definition))
}exit
}‘running with full privileges’
Get-NetAdapter -Name vEthernet* | Disable-NetAdapter -Confirm:$false
Get-NetAdapter -Name vEthernet* | Enable-NetAdapter
In order for this script to work automatically, there are a couple of things you need to do.
- Configure PowerShell script settings on your computer.
- Modify your User Account Control settings.
Configure PowerShell Settings on Your Computer
By default, the Windows PowerShell execution policy is set to Restricted. This setting prevents running of all script files, including formatting and configuration files (.ps1xml), module script files (.psm1), and Windows PowerShell profiles (.ps1). To get your execution policy use the following command.
Get-ExecutionPolicy
To get all of the execution policies that affect the current session and displays them in precedence order, use the following command.
Get-ExecutionPolicy -List
In order for you to run PowerShell scripts you need to change the default execution policy. For example to modify the policy to RemoteSigned, which will allow you to run any scripts that you created but will require digital signatures on scripts that were downloaded from the Internet (including e-mail and instant messaging programs), you will execute the following PowerShell command.
Set-ExecutionPolicy -ExecutionPolicy RemoteSigned
See Additional Resources section at the end of this article for more information on various PowerShell execution policies.
Modify User Account Control (UAC) Settings
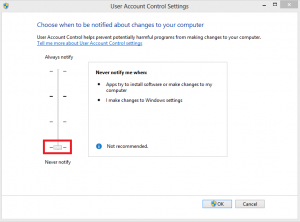
The second thing you need to do to run the above PowerShell script is to change the User Account Control settings. On a Windows 8 computer you can modify the setting by configuring it to the lowest setting. Yes, ideally you don’t want to turn off UAC but if you do, make sure you have Windows firewall enabled and you are running anti-malware software on your computer.
Using Visual Basic to Automate Script with Task Scheduler
You could use Task Scheduler in Windows 8 to schedule the PowerShell script to run automatically either at startup or at logon. However, I haven’t had as much success with Task Scheduler in Windows 7/8 as I had in the previous versions so I use Group Policy (see next section). If you decide to use Task Scheduler then you may not be able to run the PowerShell script as a scheduled task. Therefore, you can create a VBScript script that calls the PowerShell script. Here’s an example of a VBScript that I have successfully tested (running manually) on Windows 8.
Set objShell = CreateObject(“Wscript.Shell”)
objShell.Run(“powershell.exe -noexit C:\Scripts\Disable-Enable-vEthernet-Adapter.ps1”)
Because I prefer to use Group Policy, I didn’t spend much time configuring a Task Scheduler task that runs at system startup and that’s why I said that you may need to use a VBScript to call the PowerShell script. There may be other solutions out there as well that I didn’t get a chance to test.
Using Active Directory Group Policy to Run Script at Startup/Logon
The second option, which is much simpler and reliable, is to use Active Directory Group Policy. This is the method I use and recommend. If your computer is in a workgroup, instead of a domain, then use Local Group Policy Editor shown below. The steps for configuring a domain policy are very similar to configuring a local policy. In this article I will use local policy as an example.
- To start Local Group Policy Editor, run GPEDIT.MSC either at Start, Run or at the command prompt.
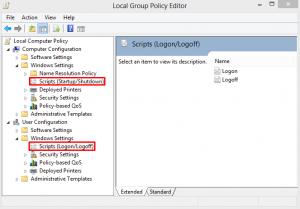
- Go to Computer Configuration -> Windows Settings -> Scripts (Startup/Shutdown) and in the right-hand side double-click Startup.
- In the Startup Properties windows click the PowerShell Scripts tab.NOTE: Because there is an ability to run PowerShell scripts in Group Policy, there is no need for you to create a VB file just to call the PowerShell script.
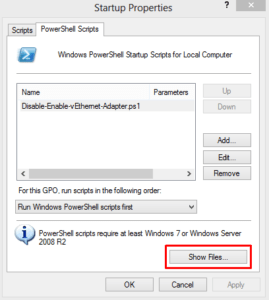
- Click add to add the PowerShell script here but before you close this window click Show Files and copy the PowerShell script to that location (the default path is C:\WINDOWS\System32\GroupPolicy\Machine\Scripts\Startup) because this is the location from which the file will be executed.
- Click OK to close the window.
- Close the Local Group Policy Editor console.
If you would like your PowerShell script to run at Logon, rather than Startup, simply go to the User Configuration settings area in the Local Group Policy Editor in step 1 above.
Additional Resources
Here are some additional resources that you may find helpful.
- Network Adapter Cmdlets in Windows PowerShell
- Use PowerShell 3.0 to Work with Network Adapters
- Execution Policies in PowerShell 2.0 and 3.0
Copyright ©2013 Zubair Alexander. All rights reserved.


yes yes yes!!!!!!!!!!!!!
Thank you so much for this. Worked first time and saved me from working into the wee hours.
I could hug you bro.